

Ever get a document back from an editor that has tons of red or blue lines (maybe even some green ones), and have no idea how to get rid of them all, or view the document the way it’s supposed to look? This article is for you!
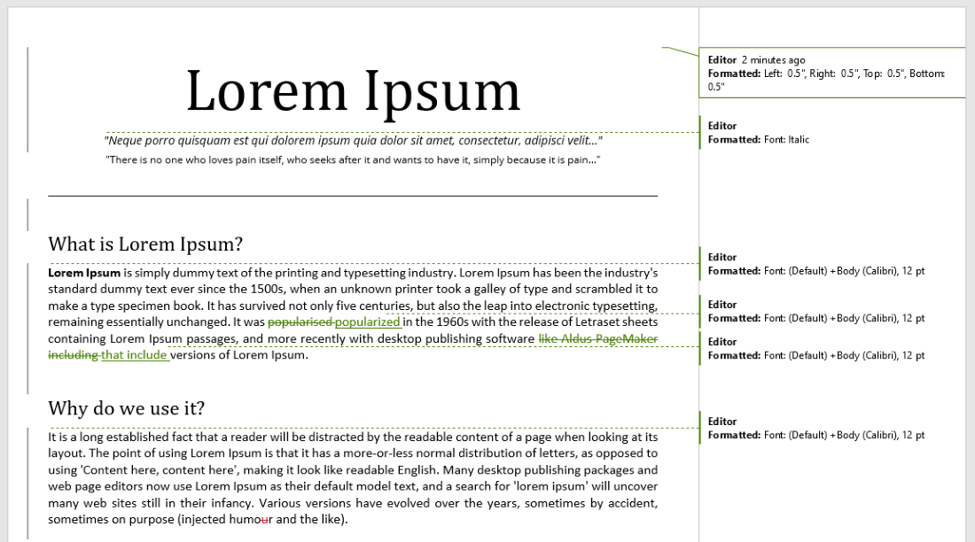
Don’t submit a document that looks like this!
Why I Love Track Changes in Word
Microsoft Word has a very useful feature called “Track Changes” that keeps track of changes that an editor makes to a document, and allows subsequent readers to see what changes were made. When the Track Changes feature is turned on, anyone who opens the document can see every change made to the original document, whether to fonts, page formats, margins, and text.
Track Changes also has a “Comments” feature that allows explanations and suggestions to be entered in the margins of your document.
The value of Track Changes to me as an editor is that my clients can see what I’ve changed, and I can see the changes they make. I do not then have to go through their resume word by word to see what alterations have occurred. It’s also easy to accept or reject changes, without having to change individual fonts or colors. Gone are the days of manually inserting a strikethrough to indicate a deletion!
The Dangers of Track Changes
Track Changes in Word can be troublesome too. You don’t want to send a document with lots of red lines and bubbles all over it to an employer or a school (many people have embarrassing stories of doing this)! The recipient then sees all the suggestions, changes, and possibly the original language and mistakes that needed changing.
As part of proofreading and preparing the final draft of a resume, cover letter, or essay, take the following steps to ensure that you do not inadvertently send a marked up copy to an employer:
Directions for MS Word 2008 for Mac
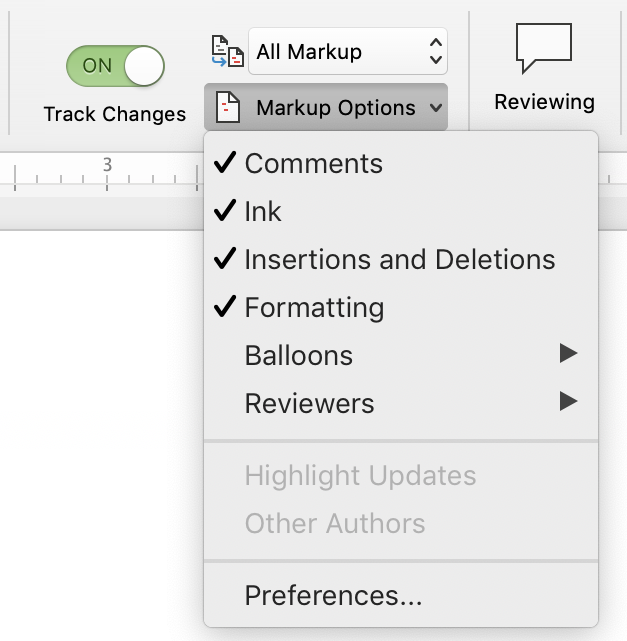
1) Check to see if there are any comments or tracked changes in the document:
Go to the “Review” tab and find the “Markup Options” drop-down menu. Make sure there are check marks next to the first four items shown (otherwise you might not see the comments or formatting changes when you look at “Final Showing Markup.”)
2) If you do not see any changes or comments and you do not make any other changes to the document, you’re good to go.
3) However, if you do see comments and tracked changes, you can do one of three things:
- Change “All Markup” to “No Markup” and save the final document as a PDF. This solution works if the place you’re submitting your resume accepts .pdf files.
- Accept all the tracked changes and delete all edits and comments (unless you only want to accept some of them, in which case see step 4). NOTE: You need to delete edits SEPARATELY from comments!
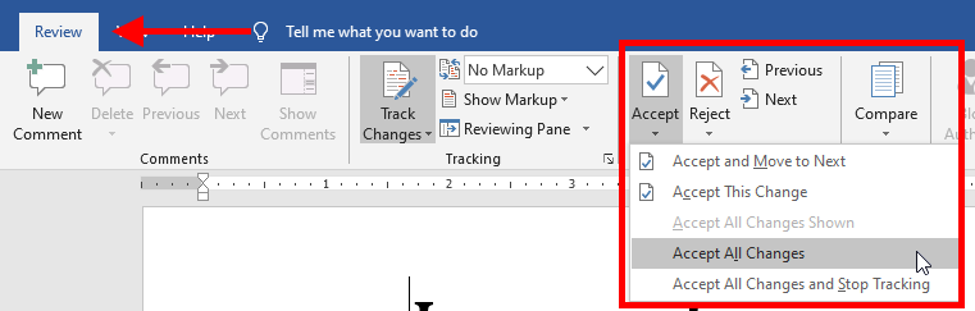
Go to the “Accept” menu with the green checkmark, and select “Accept All Changes.”

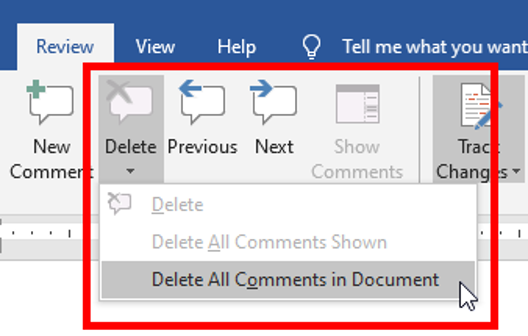
Go to the “Delete” menu with the red X, and select “Delete All Comments in Document.”
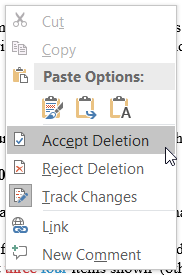
- If you want to accept some changes and delete others, you can accept or reject changes and comments one at a time. Either click on the Accept or Reject icons (then Accept and Move to Next or Reject and Move to Next),
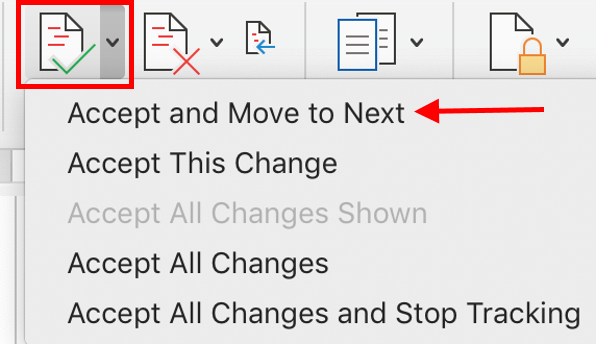
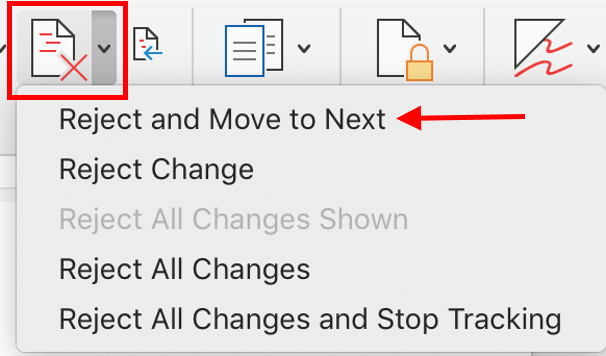
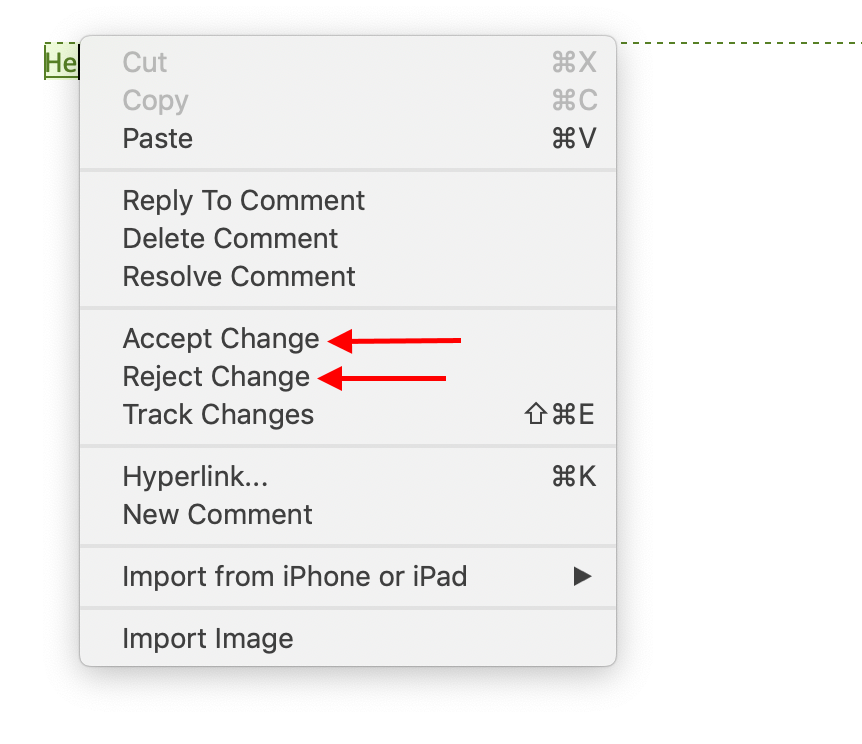
or right click on the change to reveal a drop-down menu and Accept Change or Reject Change.
- Repeat Step 1.
Directions for Track Changes in Word 2013 and Newer
1) Check to see if there are any comments or tracked changes in the document:
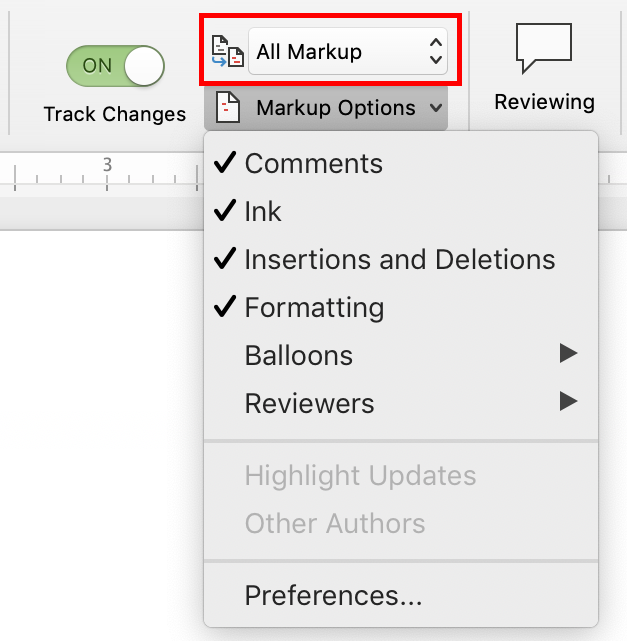
- Go to the “Review” tab and check to see that the drop-down is set to show “All Markup.”
- Click the Show Markup drop-down and check to make sure that Comments, Insertions and Deletions, and Formatting are all selected.
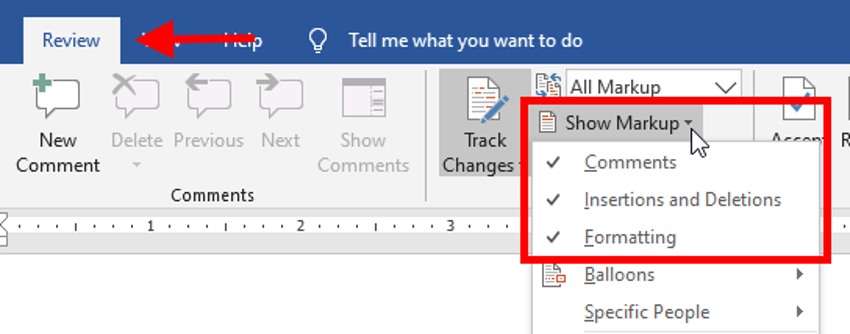
- NOTE: If the window says “All Markup” and you do not see any edits, this does not mean they are gone! Make sure you are viewing all the potential markups before determining that your document is clean.
2) If you complete the above steps and do not see any changes or comments, you’re good to go.
3) If you do see comments and tracked changes, you can do one of three things:
- Change “All Markup” to “No Markup” and save the document as a PDF. This solution works for resumes IF the place you’re submitting your resume accepts .pdf files.
- Accept all the tracked changes and delete all edits and comments (unless you only want to accept some of them, in which case see step 4). NOTE: You need to delete edits SEPARATELY from comments!
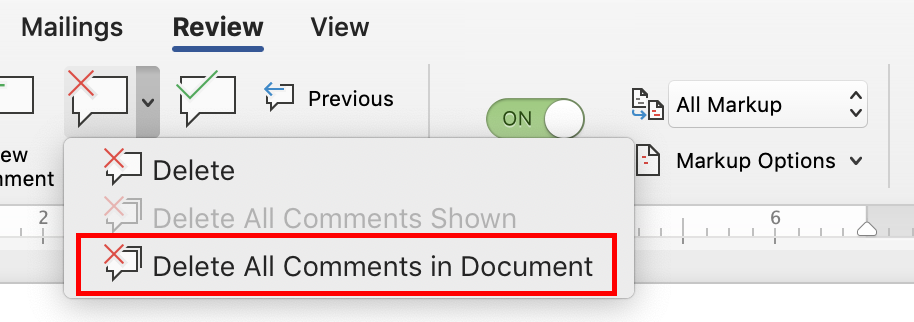
- Under the “Review” tab, click on the “Accept” icon and select “Accept All Changes.”
- Under the “Review” tab, go to the comment icon that says “Delete” (next to the “New Comment” icon) and choose “Delete All Comments in Document.”
- In Word 2016 and later, you can also use Document Inspector to check for tracked changes. You can access this tool by clicking on the File tab, then Info. Here you’ll see whether there are any remaining editing marks or comments in your document.
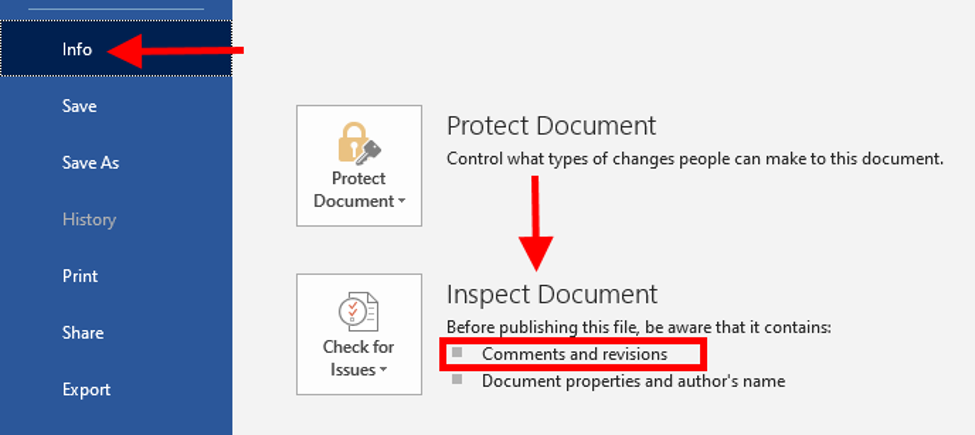
If there are no bullets listed here, you’re good to go. If there are, click the “Check for Issues” and select the Inspect Document option.
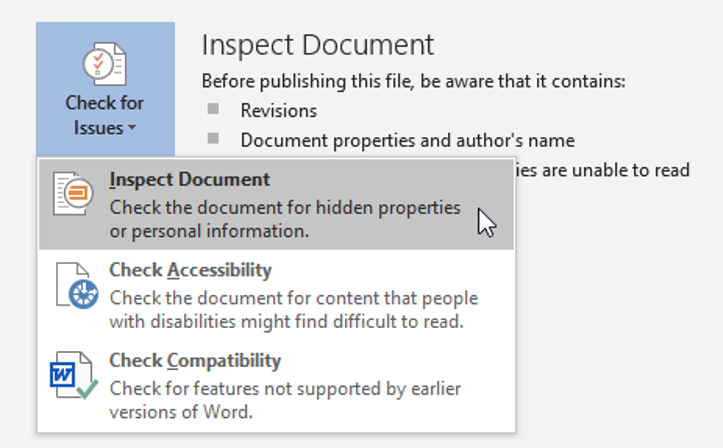
Make sure all of the boxes are checked, then click Inspect. Your results might look something like this:
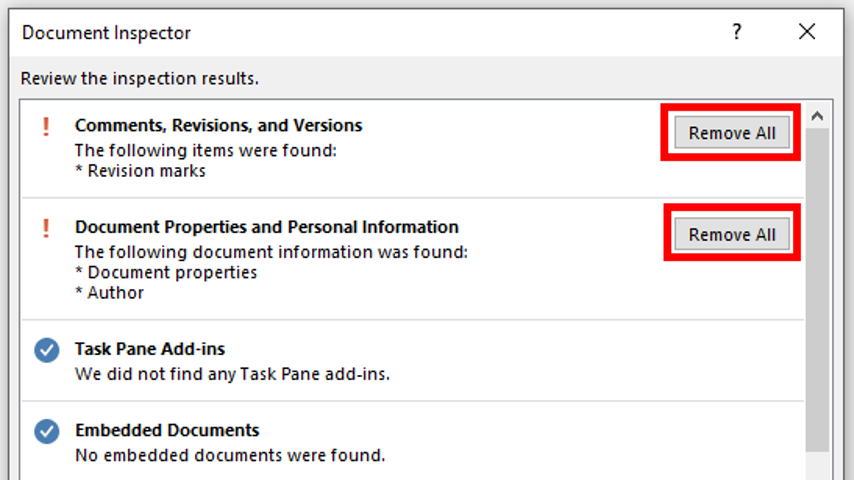
Click Remove All to get rid of any remaining Comments, Revisions, and Versions. If the document was created by a third party, you may also wish to remove authorship from the document.
- If you want to accept some changes and delete others, you can accept or reject changes and comments one at a time by right clicking on them individually. You will get a drop-down menu with choices of what to do.
- Repeat Step 1 to make sure you haven’t missed anything.
Important notes for all versions of Word:
- If you accept all changes before reviewing the document and there is a comment in the middle of your document like “(dates?)” then that change will be accepted and become a part of your document! Make sure you respond to all questions and make any revisions needed inside your document before accepting all changes.
- *ALWAYS* proofread your final document at least 3 times! As much as The Essay Expert and other editors attempt to ensure that your documents are perfect, final approval is ultimately your responsibility.
- If you don’t want all of your future edits to show up as marked on your document, turn Track Changes off by clicking on it (it will be grey when on). It’s a toggled function. Click it on, click it off.
- Finally, when you receive an edited document, whenever possible accept or reject the changes before making your own edits! This practice will make it much easier to look at the NEW edits you have made to the document.
Have Track Changes questions? Embarrassing Track Changes stories? Please share in the comments below!


Hi thanks very much for this. Suddenly when I’m using word 2011 for mac, the drop down menu will NOT appear when I right click. I then have to toggle up to the toolbar which is a nuisance. I think this may be a mouse problem as I may have inadvertently reset some mouse functions. Do you have any suggestions on restoring this ? i’ts hugely disappointing not to be able to go thru indvidually as I ‘m editing a piece. Thanks. The logitech mouse can set right click for single double and triple clicks and I tried all three but still no drop down menu. thanks
Hi Tan, I’m not a technical expert, but I think if it’s a mouse problem the issue would be appearing with other programs as well. If it’s only with Word, I would suggest reinstalling your program. Good luck!
I am a new line editor hoping to purchase a Word for Mac program so that I can line edit and track changes to send to writers who hire me. Is the Microsoft Word 16 the best program for this or would you recommend a different Word program for Mac?
Hi Connie, yes I would recommend MS Word 2016!
I plan to edit historical fiction. Do I need an Office version, Student version, Professional version, 2016 version? Or what? Thank you.
Connie
Well you need to be a student to get the student version. Other than that I would recommend chatting with customer service at Microsoft for a recommendation! You might want to consider Office 365 which is a reasonably priced yearly subscription.
Thanks. This feature is nice but it always gets on my nerves.
I understand I should be more careful, but I wish there was a default way to turn off Track Changes for printing.
I work in a company where we encourage keeping tracked changes. The problem is I constantly forget to turn it off before hitting ctrl+P and Enter.
The amount of trees I’m killing is ridiculous. Is there a way to change the default setting to not print the markups unless specifically enabled, regardless of what you see on screen?
Hi Shaun, I’m sorry you’re finding this frustrating and that so much paper is getting wasted – hopefully it’s recycled paper! There is no “default” setting to print without markup. If you don’t want changes printed, you can change the setting when you print (see https://word.tips.net/T000346_Printing_without_Track_Changes_Marks.html), or perhaps a good practice would be to save the document to pdf first and then print the pdf. That way you’ll see what the document looks like before you print it. Also when you print you get a preview so looking at that preview could remind you that there are markings in the document. Good luck!
Hi,
I want to send a document with Track Change mode and does not want that the recipient’s ability to change the mode, but he/she will be able to work on the document and share it with comments and edits.
Regards,
Anwar
Hi Anwar, as far as I know, if someone has the ability to work on the document in track changes mode, they also have the ability to turn track changes on and off. I would address your suggestion to Microsoft!
Greetings, Brenda–
I recently edited a 65-page document with track changes and comments, which is my often-used approach to editing reports multiple authors contributed to. That being said, when leadership opened the document, they were displeased to see track changes and comments. How can I stress the importance of this feature? I’ve already stated that it is imperative for them to determine if my edits are correct from a content-change perspective; nevertheless, they still don’t understand.
Hi Ron, I understand your frustration! In this situation, I would recommend sending a “clean copy” in addition to the document with changes tracked. Usually this satisfies the client, and if they want to check on anything they can always reference the document with the tracking.
Thanks for the quick reply, Brenda. The company I am working for clearly does not know how to use writers and editors. My skills may be better suited elsewhere, as I don’t see this dynamic changing since they think they know better, and as an editor, I have to flourish in my skill set. Thanks for your advice, though!
You’re welcome, Ron. I hope you find work where you are better appreciated!
Hi Brenda,
Can you throw any light on why, when I email a document that has been changed and the client wants to see the tracked changes, when they receive it and open it they see it as a clean copy! It seems to happen more when I route it through my Gmail account first. As far as I know I haven’t done anything to the settings but it is a new development!
Thanks.
Kevin, after seeing the document you referred to, and being able to see the tracked changes, I’m guessing it’s a matter of how people are viewing the document vs. the actual code in the doc.